
In this Java CI/CD lab, Jenkins runs the build jobs, Docker builds container images, and Nexus stores them. Nginx gives Jenkins and Nexus their own HTTPS addresses. Before connecting the pipeline, each service needs to work on its own.
I split the original project into two parts: install the components by hand first, then automate the setup with Terraform and Ansible. This page covers the manual installation recorded in 2020. It stops before the Java build job and Kubernetes deployment.
The original environment was an Ubuntu 18.04 VM on Google Compute Engine. The commands and screenshots below explain that environment. Several package repositories and runtime requirements have changed, so use the linked installation guides when building a new lab. The full setup has not been rerun against current releases.
Each service has a separate job
 CI/CD part 1 plan
| Component | Job in this lab |
|---|---|
| Google Compute Engine | Hosts the Ubuntu VM. |
| Jenkins | Runs build jobs and calls the other tools. |
| Docker | Builds and runs containers. |
| Nexus Repository | Stores container images in a hosted Docker repository. |
| Nginx | Accepts HTTPS requests and forwards them to the right local service. |
| kubectl | Talks to a Kubernetes API server when a later deployment step needs it. |
Keep the three service addresses separate. jenkins.thalamus.am goes to Jenkins on port 8080. nexus.thalamus.am goes to the Nexus web interface on port 8081. dockerhub.thalamus.am goes to the Docker repository connector on port 8123. Despite its name, that last address is the lab’s private registry, not Docker Hub.
Those names belong to the original lab. Use hostnames you control, DNS records that point to your VM, and certificates that cover those names. You’ll also need sudo access and a private test environment. Keep the backend ports out of public firewall rules; clients should reach them through the proxy.
The recording follows the original installation
The recording and screenshots use the interfaces available at the time. The notes below flag places where copying the old commands into a new VM would cause trouble.
Docker needs its own package repository
The original Docker installation used apt-key and the Ubuntu 18.04 repository setup. Docker’s Ubuntu installation guide now uses a separate keyring and a Signed-By repository entry. Follow that guide for a supported Ubuntu release.
For reference, these were the package steps in the historical lab:
# Historical Ubuntu 18.04 instructions, not a current installation recipe.
sudo apt remove docker docker-engine docker.io containerd runc
sudo apt install apt-transport-https ca-certificates curl gnupg-agent software-properties-common

curl -fsSL https://download.docker.com/linux/ubuntu/gpg | sudo apt-key add -
sudo apt-key fingerprint 0EBFCD88

sudo add-apt-repository "deb [arch=amd64] https://download.docker.com/linux/ubuntu \
   $(lsb_release -cs) \
   stable"

sudo apt update
sudo apt install docker-ce docker-ce-cli containerd.io
On a fresh lab VM, check Docker before introducing Jenkins:
sudo systemctl status docker
sudo docker run --rm hello-world
The test container should print its confirmation and exit. If it can’t connect to the Docker daemon, fix the service first. If the image can’t be downloaded, check the VM’s network and registry access.
Jenkins needs a Java runtime that matches its release
The lab installed OpenJDK 8 before Jenkins. That combination is historical: Java 8 does not meet current Jenkins runtime requirements. Choose the Java runtime and Jenkins release together using the Jenkins Linux installation guide. The Java version used to build your application is a separate choice from the runtime that starts Jenkins, although individual build plugins can impose extra requirements.
The old package commands were:
# Historical Jenkins repository and Java version.
sudo apt install openjdk-8-jdk

wget -q -O - https://pkg.jenkins.io/debian/jenkins.io.key | sudo apt-key add -
sudo sh -c 'echo deb https://pkg.jenkins.io/debian binary/ > \
    /etc/apt/sources.list.d/jenkins.list'

sudo apt update
sudo apt install jenkins
The original lab also gave the Jenkins service account access to Docker:
sudo usermod -aG docker jenkins
sudo systemctl restart jenkins
Restarting the service lets its new process pick up the group membership. This is a lab shortcut with a large consequence: the Docker group grants root-level privileges. A build with access to that socket can control the host. For a shared Jenkins installation, run builds on separate agents and review the controller isolation guidance before granting Docker access.
Check that Jenkins starts:
sudo systemctl status jenkins
sudo journalctl -u jenkins -n 50 --no-pager
Read the initial unlock password on the VM:
sudo cat /var/lib/jenkins/secrets/initialAdminPassword
Use that password in the setup wizard. It is a temporary bootstrap credential, not a password to reuse in a pipeline.
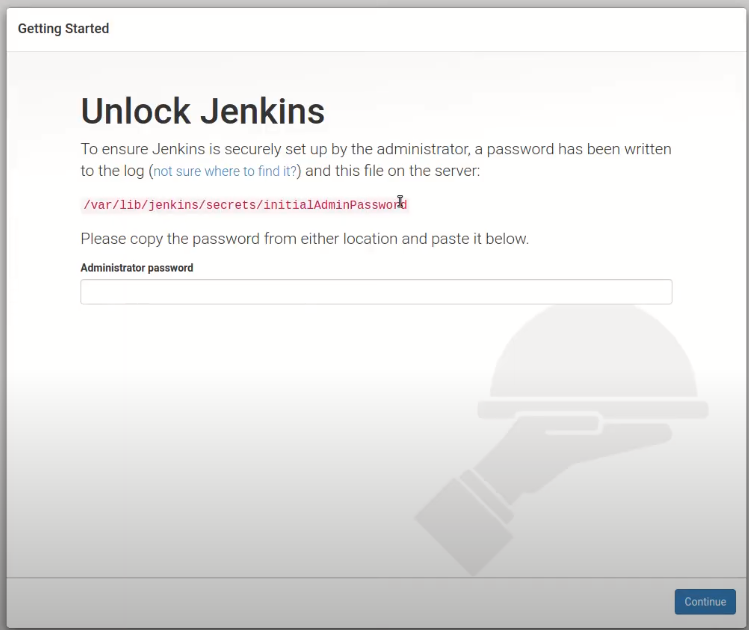 Jenkins initial unlock password
The recording installs the suggested plugins:
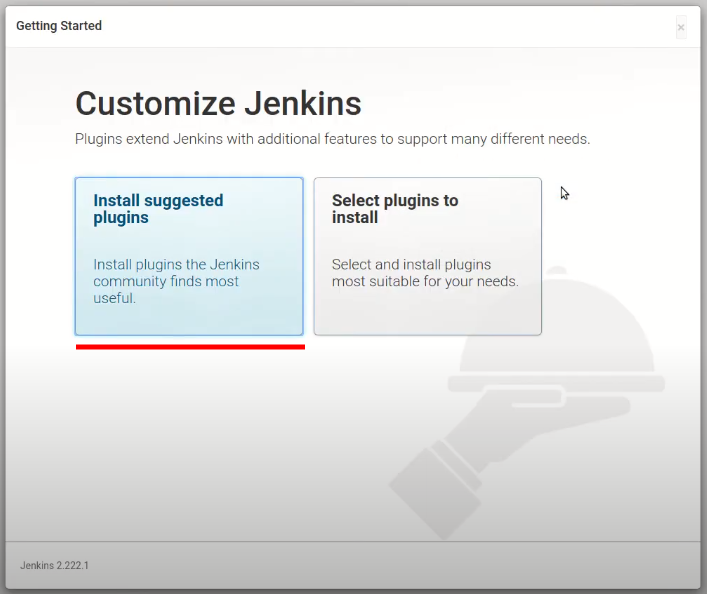 Install suggested plugins
Then it creates an administrator account:
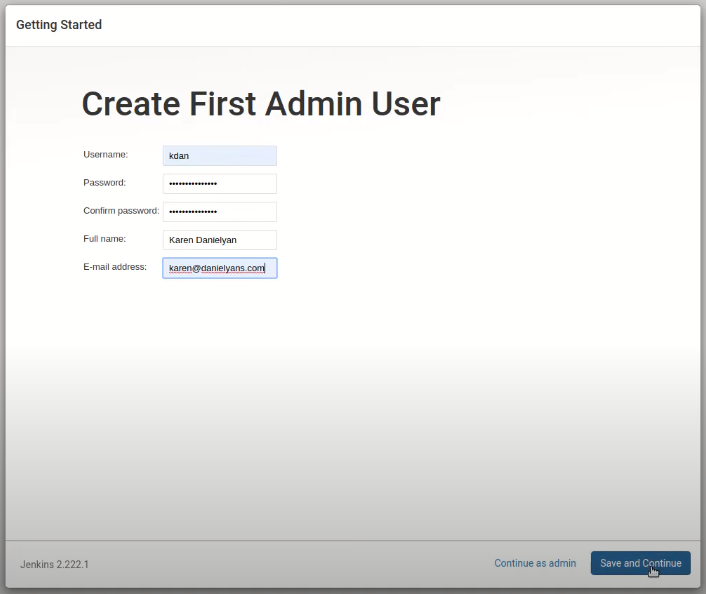 Create admin user
Once the dashboard opens, the Jenkins installation is ready for the proxy step. There is no build job yet.
Nginx sends each hostname to the right backend
The original Nginx configuration files are part of the project repository.
The recording created a self-signed certificate with this command:
# Original lab command: it does not configure client trust or DNS SANs.
sudo openssl req -x509 -nodes -days 1095 -newkey rsa:2048 \
  -keyout /etc/ssl/private/thalamus.key \
  -out /etc/ssl/certs/thalamus.crt
That command alone is not enough for a usable registry certificate. For a new lab, issue a certificate with subject alternative names for your chosen hostnames and configure the clients to trust its issuer. Docker documents how to trust a registry’s CA certificate. For public services, use a certificate from a CA your clients already trust. Keep the private key readable only by the accounts that need it.
Install Nginx, then disable the packaged default site if it is still the unused default on this lab VM:
sudo apt install nginx
sudo unlink /etc/nginx/sites-enabled/default
Check the symlink before removing it on an existing server. Disabling the site this way leaves the original file in sites-available intact.
Create /etc/nginx/sites-available/jenkins with the following lab configuration. Replace the hostnames and certificate paths for your environment.
server {
    listen 80;
    listen [::]:80;
    server_name jenkins.thalamus.am;
    return 301 https://jenkins.thalamus.am$request_uri;
}

server {
    listen 443 ssl;
    server_name jenkins.thalamus.am;

    ssl_certificate /etc/ssl/certs/thalamus.crt;
    ssl_certificate_key /etc/ssl/private/thalamus.key;

    access_log /var/log/nginx/jenkins.access.log;
    error_log /var/log/nginx/jenkins.error.log;

    location / {
        proxy_pass http://127.0.0.1:8080;
        proxy_set_header Host $host;
        proxy_set_header X-Real-IP $remote_addr;
        proxy_set_header X-Forwarded-For $proxy_add_x_forwarded_for;
        proxy_set_header X-Forwarded-Proto $scheme;
    }
}
Use listen 443 ssl to enable TLS on the listener. The old ssl on; directive is absent here because Nginx removed it in 1.25.1.
This small configuration shows the routing used in the recording. A new Jenkins setup should use the maintained Jenkins Nginx example, which also handles WebSocket agents and HTTP CLI requests. Set Jenkins’s own URL to the external HTTPS address and restrict direct access to port 8080.
Enable the site, validate the configuration, and reload only if validation succeeds:
sudo ln -s /etc/nginx/sites-available/jenkins /etc/nginx/sites-enabled/jenkins
sudo nginx -t && sudo systemctl reload nginx
If the symlink already exists, edit the existing file instead of creating another link. A 502 Bad Gateway response usually means Nginx couldn’t get a usable response from the backend; check Jenkins on 127.0.0.1:8080 and read both services’ logs.
Nexus stores its data outside the container
The lab uses Sonatype’s Nexus Repository container image. Its upstream container documentation explains the /nexus-data directory and startup behavior.
Create a named volume for repository data. The original command used the unversioned sonatype/nexus3 image, so it did not record a reproducible Nexus release. Choose and test a specific release before using this example; replace the placeholder below with that version.
NEXUS_IMAGE='sonatype/nexus3:REPLACE_WITH_A_TESTED_VERSION'
sudo docker volume create nexus
sudo docker run -d \
  -p 127.0.0.1:8081:8081 \
  -p 127.0.0.1:8123:8123 \
  --name nexus \
  --restart=always \
  -v nexus:/nexus-data \
  "$NEXUS_IMAGE"
Port 8081 serves the web interface. Port 8123 will serve the Docker repository after you create its connector. The loopback bindings keep these mappings behind the local Nginx proxy rather than publishing them on every host interface. Check your Docker version and network rules too: Docker’s port publishing guide documents a localhost exposure issue in versions before 28.0.0.
The volume holds repository content and configuration when the container is replaced. A volume is not a backup; don’t delete it while cleaning up the container.
Watch the startup log before opening the web interface:
sudo docker logs --tail 100 -f nexus
Wait for Nexus to finish starting. If it exits instead, inspect the log and check the selected release’s memory and storage requirements.
Create /etc/nginx/sites-available/nexus:
server {
    listen 80;
    server_name nexus.thalamus.am;
    return 301 https://nexus.thalamus.am$request_uri;
}

server {
    listen 443 ssl;
    server_name nexus.thalamus.am;

    ssl_certificate /etc/ssl/certs/thalamus.crt;
    ssl_certificate_key /etc/ssl/private/thalamus.key;

    access_log /var/log/nginx/nexus.access.log;
    error_log /var/log/nginx/nexus.error.log;

    location / {
        proxy_pass http://127.0.0.1:8081;
        proxy_set_header Host $host;
        proxy_set_header X-Real-IP $remote_addr;
        proxy_set_header X-Forwarded-For $proxy_add_x_forwarded_for;
        proxy_set_header X-Forwarded-Proto $scheme;
    }
}
Enable it using the same check-before-reload sequence:
sudo ln -s /etc/nginx/sites-available/nexus /etc/nginx/sites-enabled/nexus
sudo nginx -t && sudo systemctl reload nginx
Read the bootstrap password from inside the container:
sudo docker exec nexus cat /nexus-data/admin.password
This avoids depending on where Docker mounted the volume on the host. Use the bootstrap password only for initial setup. For an instance you have already configured, use its existing credentials.
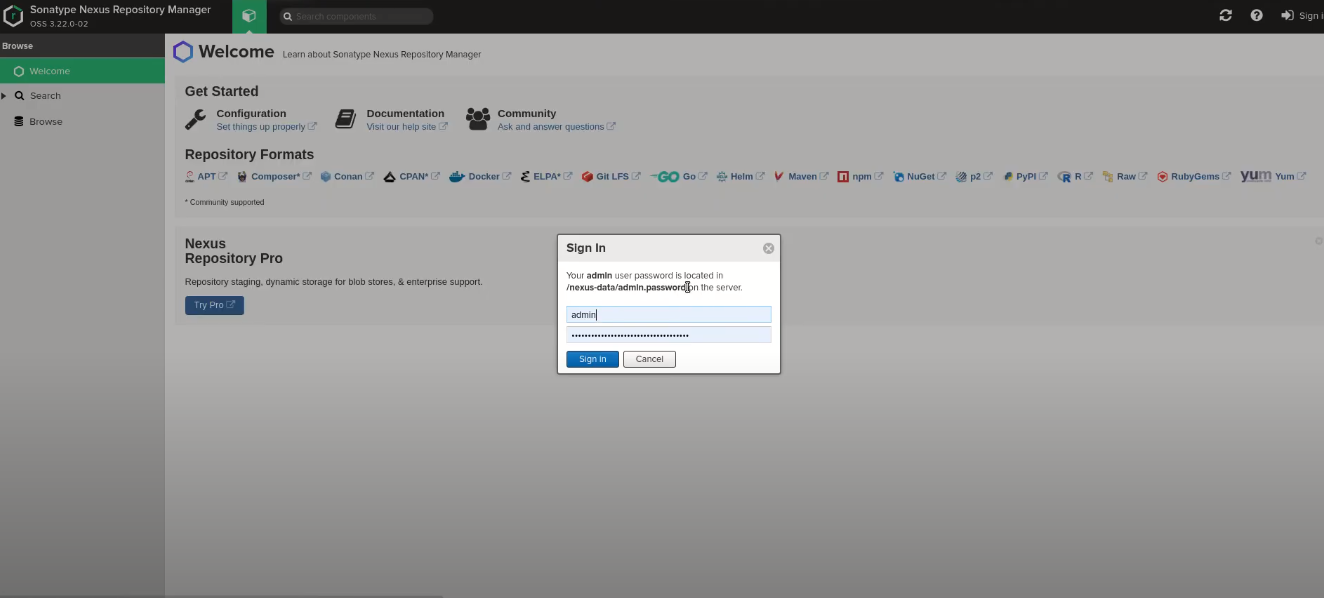 Login to Nexus
Sign in as admin and follow the setup wizard:
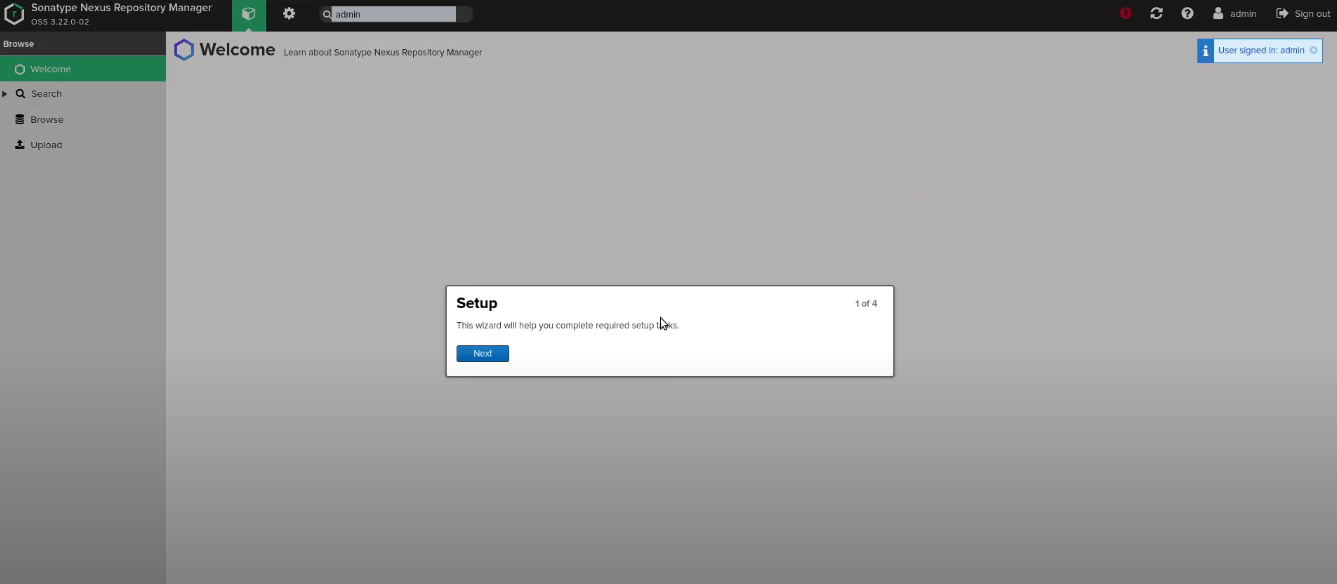 Nexus setup
Replace the bootstrap password with your own administrator password:
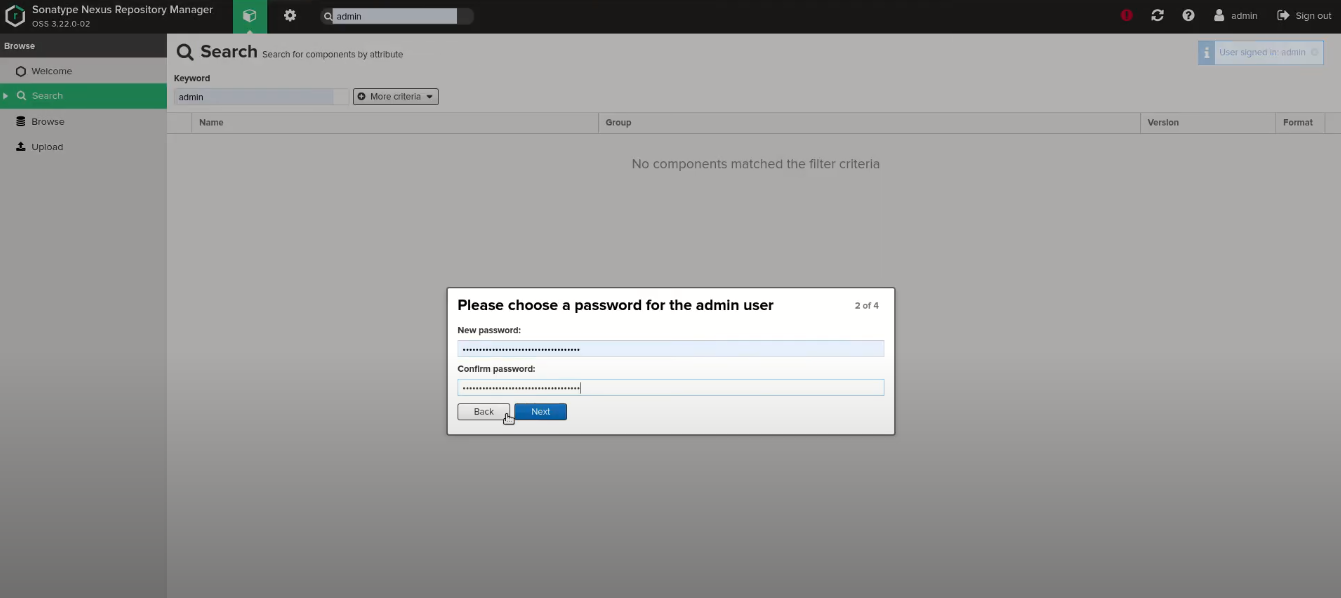 Change Nexus admin password
The Docker repository has a separate connector
In Nexus, create a hosted Docker repository. A hosted repository accepts the images your pipeline pushes; the repository’s name and its connector port are separate settings.
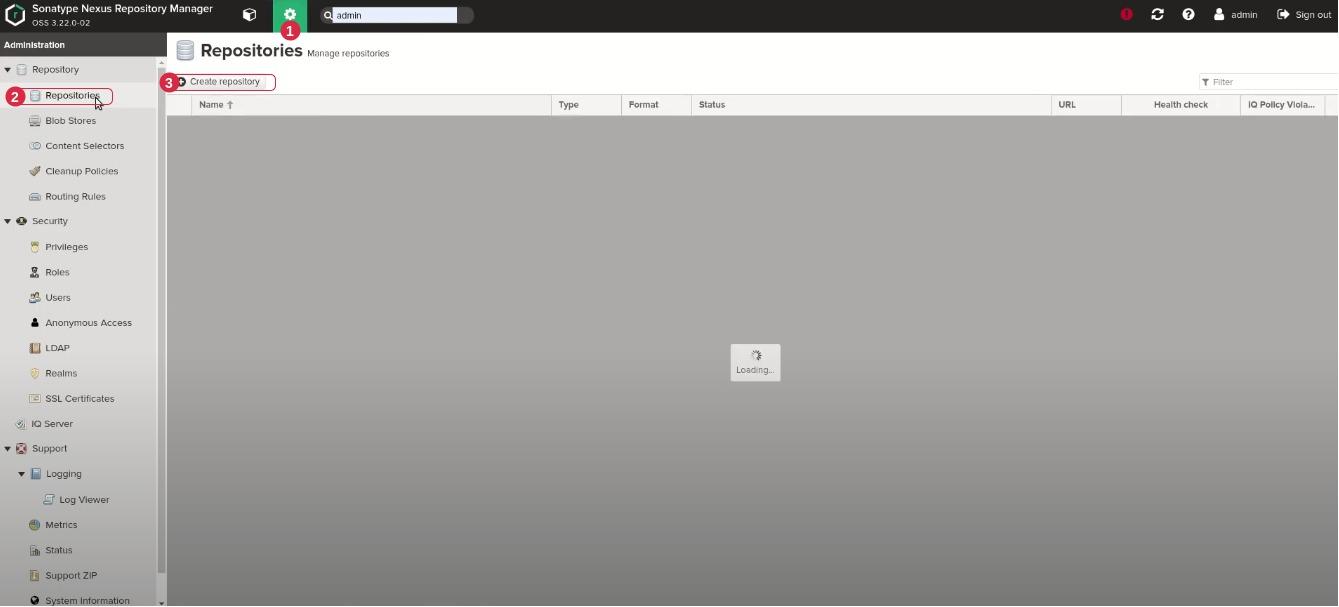 Create Docker repository
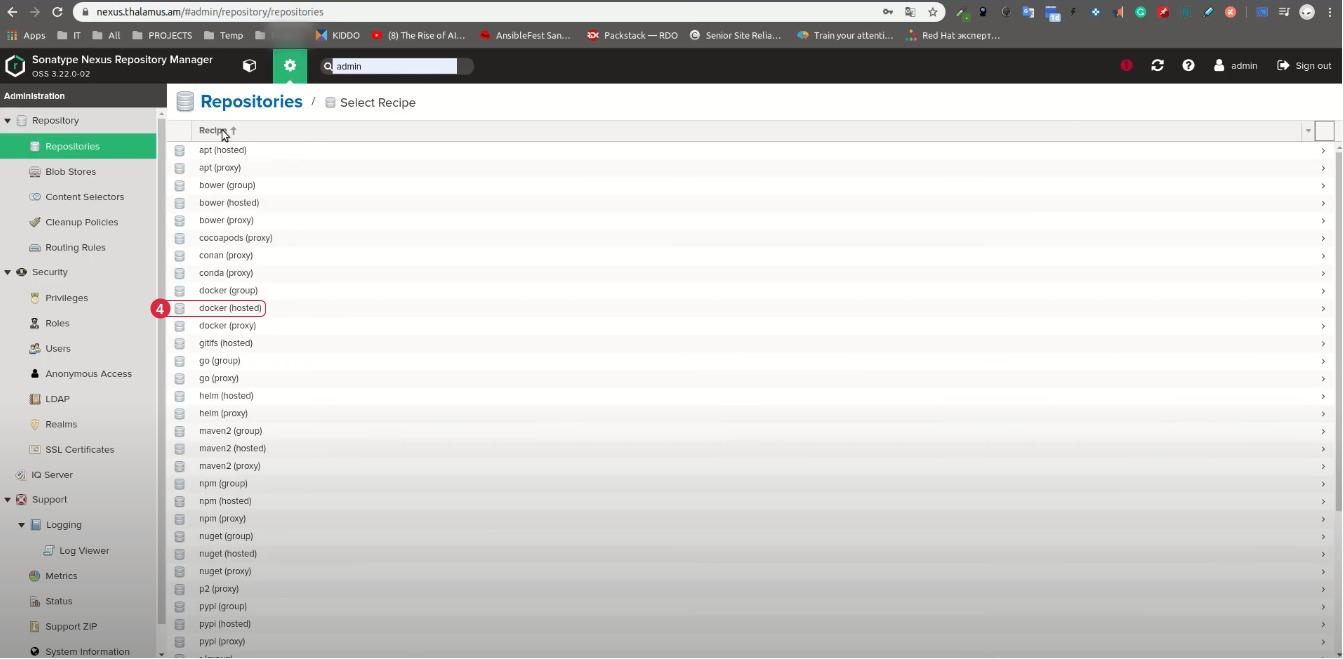 Configure Docker repository
Choose a unique repository name and set its HTTP connector to 8123 to match the container port mapping. Nginx handles external HTTPS, so this connector receives plain HTTP on the local backend.
The old screenshot includes an optional Docker V1 setting. Check the needs of your clients against Sonatype’s Docker registry documentation rather than treating every checkbox in the screenshot as required. That guide also covers registry authentication and connector choices.
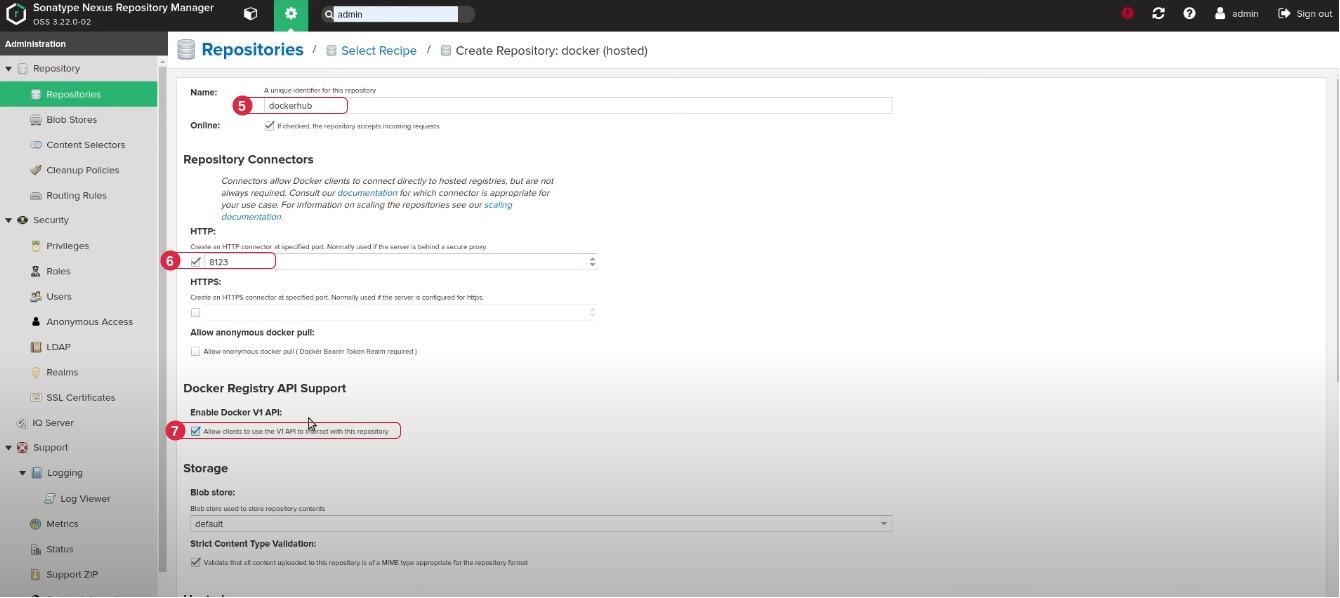 Docker repository connector
Create /etc/nginx/sites-available/dockerhub for the registry address:
server {
    listen 80;
    server_name dockerhub.thalamus.am;
    return 301 https://dockerhub.thalamus.am$request_uri;
}

server {
    listen 443 ssl;
    server_name dockerhub.thalamus.am;

    proxy_send_timeout 120;
    proxy_read_timeout 300;
    proxy_buffering off;
    tcp_nodelay on;
    server_tokens off;
    client_max_body_size 1G;

    ssl_certificate /etc/ssl/certs/thalamus.crt;
    ssl_certificate_key /etc/ssl/private/thalamus.key;
    keepalive_timeout 60;

    access_log /var/log/nginx/dockerhub.access.log;
    error_log /var/log/nginx/dockerhub.error.log;

    location / {
        proxy_pass http://127.0.0.1:8123;
        proxy_set_header Host $host;
        proxy_set_header X-Real-IP $remote_addr;
        proxy_set_header X-Forwarded-For $proxy_add_x_forwarded_for;
        proxy_set_header X-Forwarded-Proto $scheme;
    }
}
The 1G upload limit is a lab setting. Choose a limit that fits the image layers your pipeline needs to push. The snippets here explain the proxy path; they are not a complete TLS or registry security configuration.
Enable the registry site:
sudo ln -s /etc/nginx/sites-available/dockerhub /etc/nginx/sites-enabled/dockerhub
sudo nginx -t && sudo systemctl reload nginx
Opening the Nexus web interface proves that port 8081 works. It doesn’t prove that the Docker connector on 8123 is ready. Before adding a pipeline, test registry authentication and a push/pull using a dedicated account with the repository permissions it needs. Follow the selected Nexus release’s authentication steps and configure certificate trust on the Docker client.
kubectl is a client, not a cluster installer
The original article installed kubectl version 1.15.7-00 from the old Google-hosted package repository:
# Historical reference only: this package repository is no longer available.
curl -s https://packages.cloud.google.com/apt/doc/apt-key.gpg | sudo apt-key add -
cat << EOF | sudo tee /etc/apt/sources.list.d/kubernetes.list
deb https://apt.kubernetes.io/ kubernetes-xenial main
EOF

sudo apt update
sudo apt install -y kubectl=1.15.7-00
That repository was removed in March 2024. These commands cannot install the client today. Use the current kubectl Linux installation guide and select a client within one minor version of the cluster’s API server.
After installing a compatible client, check which binary you have:
kubectl version --client
This checks the local tool. It does not create a Kubernetes cluster or prove that Jenkins can deploy to one. Deployment also needs a cluster, a kubeconfig, and an identity with suitable permissions. Keep those credentials out of source code.
Trace one image before automating the setup
At this point, the lab has places to run jobs and store images. It still needs the Java build job, repository credentials, and a deployment target before it is a working delivery pipeline.
Before you automate it, draw the path of one image push: the registry hostname, the Nginx listener, the Nexus connector, and the data volume. Then pick one failure, such as a 502 response, and identify the first log you would read. That’s a small exercise, but it tells you whether you understand how the pieces connect.
The next step is to test that path in your own lab, record the versions that worked, and only then automate those choices with Terraform and Ansible.